See every booking by day, week or team member.
What This Page Is About
The Calendar page gives you a complete visual view of all your bookings.
You can switch between Month, Week, and Day views, create new bookings directly from the calendar, and manage existing bookings by clicking on them.
This is the fastest way to understand your schedule and team availability.
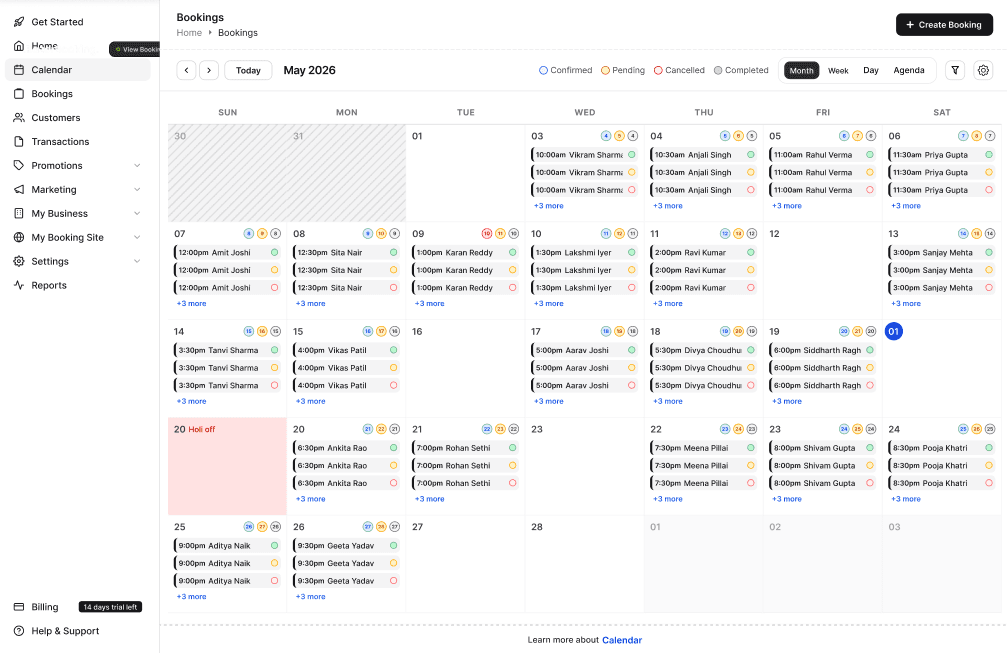
Calendar Views
At the top of the calendar, you can choose your display style:
Month View (Default)
Shows all bookings for the entire month
→ Best for overview and planning
Week View
Shows bookings for the current week, broken down by day
→ Good for team scheduling & workload viewing
Day View
Shows bookings hour-by-hour for one day
→ Best for detailed scheduling
Navigating the Calendar
At the top-left of the calendar:
Right Arrow → Move to next month/week/day
Left Arrow ← Move to previous month/week/day
Today Button (if available) brings you back to the current date
Creating a Booking from the Calendar
To add a booking:
Click on any date (Month view) or date/time slot (Week/Day view)
The Create Booking Modal opens
Fill in:
Customer details
Service
Team member
Date & time
Payment summary
Click Create Booking
The new booking appears directly on the calendar.
How Bookings Appear on the Calendar
Bookings appear as black-colored bars
They usually show:
Customer Name
Service Name
Booking time (in Week/Day view)
You can click on any booking bar to open the Booking Details Popup.
Booking Details Popup (After Clicking a Booking)
When you click on an existing booking in the calendar, a detailed booking popup appears.
This popup has three tabs:
TAB 1: Details
This tab shows complete booking information:
A. Booking Status
Confirmed
Pending
Cancelled
B. Customer Details
Name
Email
Phone
C. Booking Information
Booking date & time
Service name
Service duration
Team member assigned
D. Price & Payment Summary
Total booking amount
Payment received so far
Payment status:
Pending
Partial Paid
Paid
Overpaid
E. Edit Booking Button (Top-Right)
Clicking Edit Booking opens the same booking form with all fields prefilled:
You can change customer
Change service
Change time
Change team
Update payment summary
Update notes
F. Two Action Buttons Below
1. Cancel Booking
Marks booking as cancelled
Calendar updates instantly
Customer receives a notification (if enabled)
2. Take Payment
Opens the Take Payment Modal.
Take Payment Modal (from Details tab)
In this modal, you specify how much the customer is paying and via which method.
Fields:
Amount Received
Payment Method
Cash (Transaction ID optional)
Online
Enter email
A payment link is sent to the customer
Other
Transaction ID optional
Click Save Payment to record the payment.
Payment status updates instantly.
TAB 2: Past Payments
This tab shows all payments that have been made for this booking.
For each payment entry, you will see:
Amount
Date
Payment method
Transaction ID
Payment status
And two buttons:
1. Edit Payment
You cannot change the amount
Only the Transaction ID can be edited
This is useful for correcting mistakes
2. Refund
Takes you to the Refund Modal.
Refund Modal (from Past Payments tab)
Here you can refund the customer:
Choose which payments to refund
You will see a list of all payments
Select which ones you want to refund
Refund Type:
Full Refund → Refund total amount paid
Partial Refund → Enter any amount to refund
Click Initiate Refund to process it.
Refunds appear in the payment history.
TAB 3: Previous Bookings
This tab shows all past bookings made by the same customer.
For each previous booking, you may see:
Service Name
Booking date
Total amount
Payment status (full paid / partially paid)
Booking status
This helps you understand customer history at a glance.
Additional Features
✔ Quick Indicators
You can visually identify bookings and availability across your team.
✔ Availability Rules
Calendar availability is influenced by:
Shifts
Special Hours
Break Off for team members
Staff not available (red)
Business closed days
✔ Real-time Updates
Everything updates instantly after saving a booking or payment.
Tips & Best Practices
Use Day View for maximum clarity when the schedule is busy
Always review the team availability to avoid double booking
Use the Past Payments tab to keep financial records clean
Use the refund tool only after confirming refund amount
Use customer history to personalize interactions
Cancel bookings instead of deleting — cancellations keep records transparent
Common Questions (FAQ)
Q. Can I edit a booking from the calendar?
Yes — click the booking → Edit Booking button.
Q. Is payment required at the time of booking?
Depends on your service settings:
Free
Fixed
Custom label
Partial / full payment rules
Q. Can I undo a cancellation?
No. You must create a new booking.
Related Pages
Need Help
If you need assistance, contact support or use the in-app chat.